Now that I have finished putting together the necessary circuits to read the thermistor and control the heating element, I need to provide some simple circuits for the user interface.
The Front Panel
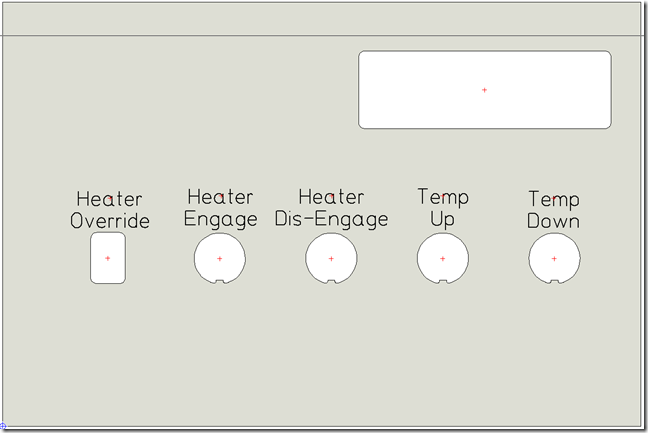
Below is a mock up of what I want the front panel to look like:
At the top right I will have a 16×2 LCD Display with a series of switches to control the heating element and set temperature for the temperature monitoring service.
- Heater Override – This switch will allow the user to cut off the return signal from the main circuit board back the Turkey Fryer 12V Relay to keep from accidentally dry firing the heating element.
- Heater Engage – This push button is used to signal the Netduino that the heater can be engaged and until pushed will not allow the Temperature Service to turn the heating element on.
- Heater Dis-Engage – This push button is used to signal the Netduino that the heater should be dis-engaged immediately, kind of like an all-stop button.
- Temp Up – This push button will raise the temperature monitoring service’s set temperature by one degree.
- Temp Down – This push button will lower the temperature monitoring service’s set temperature by one degree.
This is a pretty simple interface, but it provides all the basic necessities to control the Turkey Fryer during a brewing session.
The Main Board Connections
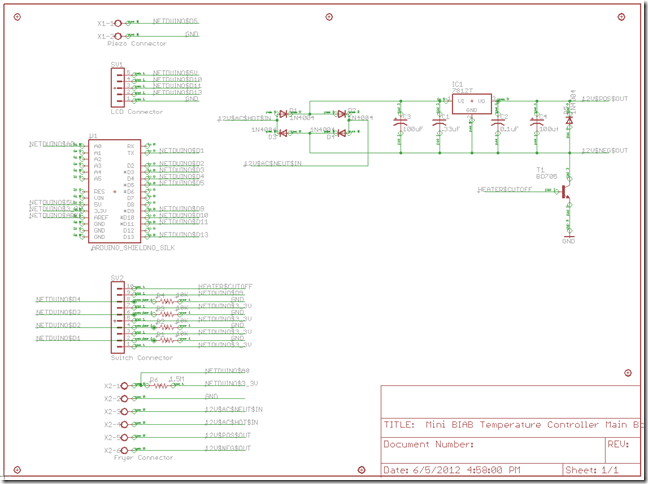
Below is the schematic for the main circuit board of the system along the right hand side you can see the various connectors that will be used to wire the switches into the Netduino:
I have wired each of the push button switches using a pull-down resistor configuration, this keeps the signal to the Netduino ports low until the push buttons are pushed connecting the ports to 3.3V. The switch connections are wired into a series of header pins that will be used to connect each switch to the main board.
I have also ran Netduino Pin5 to a second screw terminal that connects to a Peizo speaker that is used to provide an audible signal when the temperature of the Fryer reaches the set temperature and again when a mash step completes. I’ll explain the code in a later post.
There is one last connector in the upper left of the schematic and this one connects the main circuit board to the LCD Display Daughter board. This connector extends the Netduino SPI ports 10, 11 and 13 to the daughter board along with 5V and Ground which are used to power the LCD Display.
In the next post I’ll cover the LCD Display Daughter Board and how you can use 3 Netduino pins to drive a 16 x 2 LCD Display.
Till next time, stay sanitized and keep an eye on those fermentation temps and I’ll catch you for a pint around the keg.
Jim Lavin – Otaku Brewer


